
How to Prepare a Coco Coir Brick for Growing Mushrooms
How to Prepare a Coco Coir Brick
To prepare a standard 650g coco coir brick for mushroom cultivation, it will need to be hydrated and pasteurized. Mushrooms need a moist and fertile substrate in which to grow. This is a relatively low cost and easy way to prepare a mushroom substrate. It is as simple as placing your ingredients in a clean bucket and adding hot water. I will explain further.
"Safety Note: This guide involves handling boiling water. Please exercise caution to avoid burns. Additionally, maintaining cleanliness throughout this process is crucial for successful mushroom cultivation and preventing contamination."
Supplies Needed to Prepare Your Coco Coir Brick

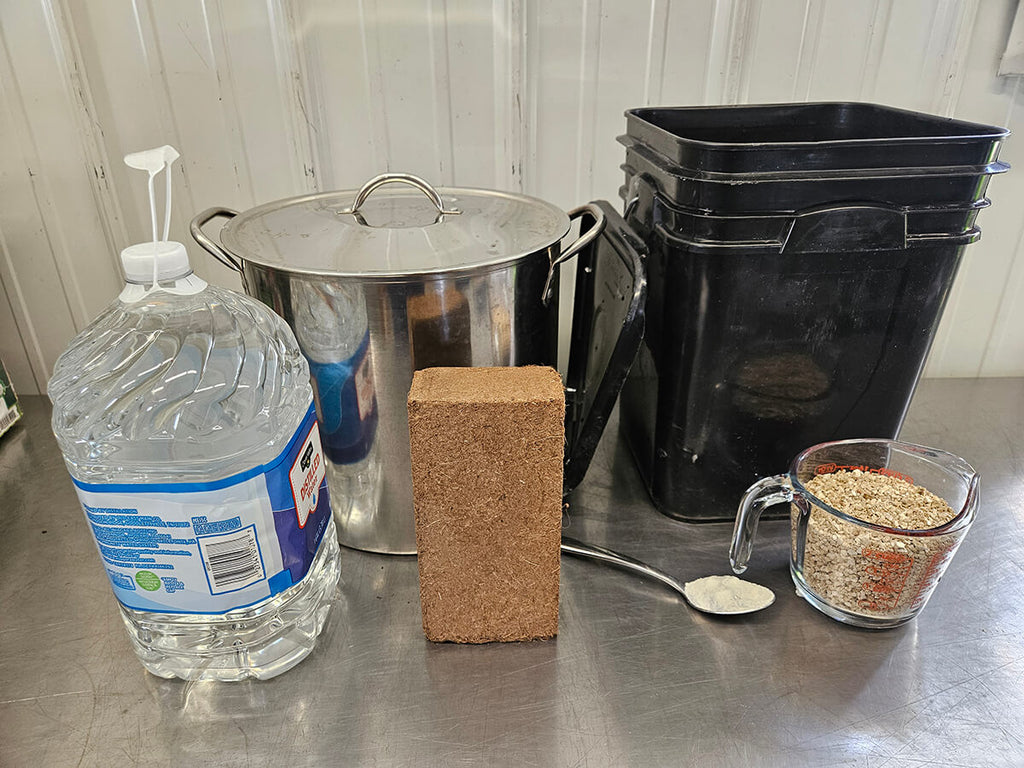
To get started you will need some supplies. Please see the list below.
- A standard 650-gram coco coir brick
- A clean bucket with a lid
- 1 Tablespoon of gypsum
- 2 Cups of vermiculite
- A pan for boiling water
- 1 Gallon spring water
- A clean utensil for mixing
Let's Prepare the Coco Coir Brick

First let's make sure the bucket and lid we are using are clean. Simply use a dish sponge and warm soapy water to clean out the bucket and the lid. Rinse thoroughly and set the bucket and lid aside.
Next remove the coco coir brick from any packaging and place it in the bucket. Now add 1 tablespoon of gypsum and 2 cups of vermiculite to the bucket. Add the vermiculite gently or it can create a lot of dust.
Once all your ingredients are in the clean bucket it's now time to hydrate and pasteurize the coco coir brick and additives.

How to Pasteurize Your Coco Coir Brick
Your coco coir brick must be pasteurized to kill off any unwanted microbes or mold spores. This is done with boiling water.

In a medium to large pot add your gallon of spring water. Bring the water to a roiling boil. Next you will very carefully pour the gallon of boiled water into the bucket. Once the water is added to the bucket, seal the top with the lid.
Pour In The Boiling Water
Use caution when putting on the lid as the boiling water you just added will produce steam, which can burn you if you're not careful. Leave the bucket sealed for at least 2 hours or until cool. Let the bucket and coco coir brick cool naturally, this can take a little time.

Mixing Your Coco Coir Brick Mushroom Substrate
After your bucket has cooled down go ahead and open it up. Using your clean utensil , go ahead and mix all the ingredients that are in the bucket.

Once mixed, replace the lid on the bucket until you are ready to use the mushroom substrate. You can store it in the bucket with a sealed lid in a cool dry location for up to a month, but it is best used as soon as possible.
How to Tell When Your Coco Coir Brick Substrate Is Just Right
A properly prepared coco coir brick substrate should have a specific consistency. When you squeeze a handful of the mixed substrate, it should hold together without crumbling apart, but only release a few drops of water between your fingers.

The substrate should be dark brown in color and feel moist but not soggy. If it's dripping wet, you may need to add a bit more dry coco coir to achieve the proper field capacity. This "just right" moisture level is crucial for optimal mycelium growth.
Why Did We Pasteurize the Coco Coir Brick?
The process of pasteurization kills off harmful bacteria and mold spores, while leaving beneficial bacteria alive. This is done with heat and is why we boiled the water prior to adding it to the bucket. Pasteurization occurs between 140 and 180°F. You may be asking, well why did we boil the water then? The answer is because the bucket and all the ingredients will lower the water temperature immediately when added so we needed a little buffer.
Why Did We Include Additives to the Coco Coir Brick?

The additives we included help with aeration, water retention and minerals. We added vermiculite because it has amazing water retention properties and adds a light fluffy texture to our coco coir brick mushroom substrate. The gypsum we added provided calcium and sulfur, both of which are essential to healthy mycelium growth. There are other additives you can experiment with; however, this guide includes the basics to get you going and is sufficient for mushroom production.
How to Use Your Coco Coir Brick Mushroom Substrate to Grow Mushrooms
Great job! You fully prepared your coco coir brick for growing mushrooms, but now what? Well, it's time to use it. To use your newly made mushroom substrate you will need to add it to a vessel for cultivation. This guide assumes you already have mushroom spawn made. There are a lot of ways to do this but in this guide, we will touch on two different ways.
Mushroom Grow Bags

Your first option is to use mushroom grow bags. Mushroom grow bags are polypropylene plastic bags that have a filter patch on them. They can be bought in many places, but we suggest looking for suppliers with extensive experience in the mushroom industry. Once you have your mushroom grow bag you can simply place your pasteurized coco coir brick mushroom substrate inside of the bag and add 1 to 2 quarts of the mushroom spawn of your choice. Seal the top of the bag with a heat sealer or tape and mix the contents. Place the mushroom grow bag in normal room temps out of direct sunlight. Allow the mycelium to spread and colonize all the mushroom substrate. This can take 1-3 weeks depending on environmental and mushroom genetics variations.
Mono Tub Set Up for Growing Mushrooms
Your second option is to use a mono tub type set up. A mono tub refers to a tote or tub used to grow mushrooms. A simple 60+ quart clear tote from Walmart will work just fine for this. Once you have your tote, clean it with warm soapy water just like we did with the bucket mentioned earlier. Once your tote is clean simply add your coco coir brick mushroom substrate to the tote and mix in 1-2 quarts of mushroom spawn. We suggest you wear some medical gloves or at the very least make sure your hands and arms are cleaned with warm water and soap prior to mixing.

Now that your mushroom spawn and coco coir brick mushroom substrate are evenly mixed, make sure the surface is relatively level and gently compressed. Place the lid on the tote and store it in a dark area at normal room temperatures. Allow the coco coir brick mushroom substrate to fully colonize and introduce fruiting conditions once you see pinning. There are many ways to make a mono tub, but this way is low cost and efficient. Some may cut holes in the tote and place filters over them, but that is not needed. You will only introduce fresh air during fruiting, and this can be done by opening the lid and fanning.
Conclusion
We covered all the ingredients you will need and the process of preparing your coco coir brick for mushroom cultivation. This is a very low cost and beginner friendly way to make a simple mushroom substrate. If you followed the instructions provided you should now have fully prepared your coco coir brick for mushroom cultivation. We hope you find this guide useful and wish you all the best luck with your mushroom-growing adventures.
Common Troubleshooting with Coco Coir Brick Preparation
Slow Colonization
If your coco coir brick substrate is colonizing slowly, check your temperature. Most mushroom mycelium colonizes fastest at 75-80°F. Also ensure your substrate wasn't overly compacted, as mycelium needs some air space to grow properly.
Over-Hydrated Substrate
If you notice pooling water or your coco coir brick substrate feels soggy, you may have added too much water. You can fix this by adding more dry coco coir or vermiculite to absorb the excess moisture, or spread the substrate out on a clean surface to allow some water to evaporate.
FAQ'S
What size coco coir brick should I use?
This guide is for a standard 650 gram coco coir brick.
Where can I find the supplies listed in this guide?
All the supplies listed in this guide can be found at most any big box store like Walmart or Home Depot.
What if my coco coir brick isn't fully hydrated?
If after the 2 hours wait for the bucket to cool down you find your coco coir brick is not fully hydrated, boil 4 more cups of water and dump it in the bucket. Reseal the lid and wait another hour.
What kind of gypsum do I use?
It is preferable if you use agriculture grade gypsum if possible. We offer it here and it can be ordered online. The pelletized gypsum you may find in the garden center can work, but the agriculture grade gypsum has no fillers and does a better job.
How much mushroom substrate will this guide make?
Not all coco coir bricks are created equal, but on average you should end up with 8 to 9 pounds of usable mushroom substrate. This will be approximately 10 to 12 quarts in volume.
What if my mushroom substrate gets contaminated?
If your mushroom substrate gets contaminated, it is best to toss it out and start over. Double check your process and stick to the guide. Growing mushrooms can be a learning curve, however once you get it down, it will become much easier.